![]()
Using the Integrated Search
You can expand the Web search to any Web-accessible files on your server, even if they are not part of Ektron CMS400.NET. This feature is called Integrated Web Search.
Note: The Integrated Search only works with a Web Search server control that is placed on a Web page. It does not work with the Workarea search or any other search server control.
Use an Integrated Search if your site’s search should include non-Ektron CMS400.NET files which, nevertheless, need to be searchable by site visitors. For example, a folder of personnel policy documents should be searchable on your intranet but you do not want to add them to Ektron CMS400.NET.
As another example, you have a Web site of static HTML pages, and are now deploying Ektron CMS400.NET for certain parts of the site, such as job listings or a discussion forum. You can create a page with an Integrated Search that encompasses your entire site.
Integrated Search Overview
To set up an Integrated Search, place the content in a Web-accessible folder on the server’s file system. Then, create one or more virtual directories that point to the Web-accessible folder. Next, use the Workarea's Add Integrated Search Folder screen to identify the Integrated Search folder and, if desired, file types to include or exclude when searching. The procedure for doing this is explained in Setting up a Virtual Directory.
Setting up a Virtual Directory
A virtual directory is one that resides in the site root folder, but contains no content -- instead, it points to a Web-accessible folder anywhere in the file system. The Web-accessible folder contains the content referenced by the Integrated Search.
Important: Although a virtual directory does not need to be on the same server as your site, it must be on the same domain as your site’s server.
Since creating a virtual folder is a Windows procedure, it is explained in these articles.
IIS 7: http://technet.microsoft.com/en-us/library/cc771804%28WS.10%29.aspx
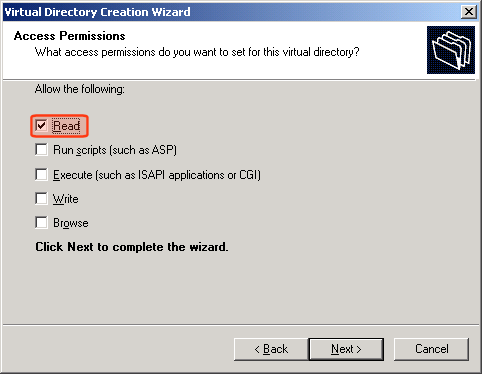
On the Access Permissions screen that appears during the setup, only check Read (see below).
Setting up an Integrated Search
There are four parts to setting up an Integrated Search.
Creating an Integrated Search Folder Structure
Update the Ektron windows service.exe.config File
Assign the Integrated Search Folder to the WebSearch Server Control
Identifying Integrated Search Folder Information in the Workarea
After setting up an Integrated Search, you might want to do these things:
Viewing All Integrated Search Folders
Viewing an Integrated Search Folder
Editing an Integrated Search Folder
Creating an Integrated Search Folder Structure
1. Create a virtual folder that points to any Web-accessible folder in your file system. See Also: Setting up a Virtual Directory
2. Place files to be searched in the Web-accessible folder or its child folders.
Update the Ektron windows service.exe.config File
1. Open c:\Program Files\Ektron\EktronWindowsService
2. Update elements as shown below.
<add key="PdfGeneratorEnabled" value="true"/>
<add key="CustomSearchEnabled" value="true"/>
Assign the Integrated Search Folder to the WebSearch Server Control
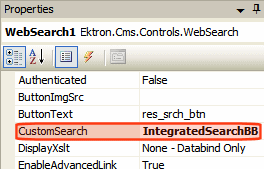
To find Integrated Search content, users must access a Web page that contains a WebSearch server control. Further, you must assign to that control’s CustomSearch property the names of all top-level Integrated Search folders (see illustration below). Any child folders under the top-level folders are included in the search.
Identifying Integrated Search Folder Information in the Workarea
Follow this procedure for every folder that contains Integrated Search content.
1. In the CMS Workarea, go to Settings > Configuration > Integrated Search Folders.
2. Click Add ( ).
).
3. The Add Integrated Search Folder screen appears.
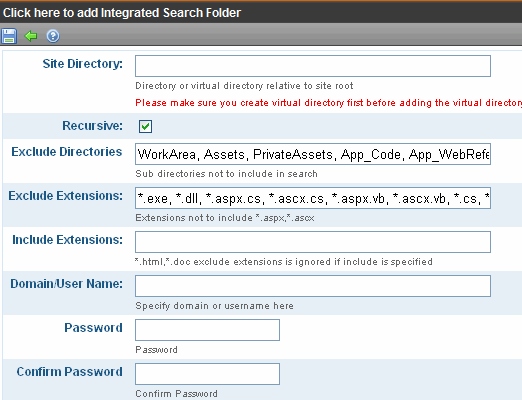
4. Complete the fields as described in the table below.
To include all files in the folder (except those that would typically not be searched, such as .exe and .dll files), do not modify the Include Extensions and Exclude Extensions fields.
|
Field |
Description |
|
Site Directory |
Enter the name of the parent folder (or virtual folder) that contains the searchable, non-Ektron CMS400.NET content. This folder must reside in the site root folder. If you are using a virtual folder, enter its name, not the folder that contains the content. |
|
Recursive |
Check this box if you want the search to include all child folders under the folder in the Site Directory field. |
|
Exclude Directories |
If you want to exclude files in any directory underneath the directory listed in the Site Directory field, enter the names of the directories to exclude. You do not need to enter the path to the directory -- only the name. If you enter more than one directory, use a comma to separate them. By default, Ektron CMS400.NET places several directories that a search would typically ignore. Edit as needed. |
|
Exclude Extensions |
If you want the search to ignore certain file types, enter those extensions in this format: *.filetype. For example *.xml. If you enter more than one, separate them with a comma (,). By default, Ektron CMS400.NET inserts several file types that a search would typically ignore. Edit as needed. Warning! - If you enter any value into the Include Extensions field, this field is ignored. |
|
Include Extensions |
If you want the search to include only certain file types, enter those extensions in this format: *.filetype. For example *.xml. If you enter more than one, separate them with a comma (,). Warning! - If you enter any value into this field, the Exclude Extensions field is ignored. |
|
Domain/User Name, Password and Confirm Password |
If the parent folder is a virtual folder that points to another server, enter the domain\user name and password needed to access that server. The parent folder is identified at the Site Directory field. |
Important: Ektron’s Windows service runs hourly to index these files. So, you will not see search results for at least an hour after you set up this feature.
See Also: Using the Integrated Search
Viewing All Integrated Search Folders
To view all integrated search folders, go to Settings > Configuration > Integrated Search Folders. The screen displays every folder that will be included in the Integrated Search. See Also: Using the Integrated Search
Click any folder to edit its properties or delete it.
If you want to create a new Integrated Search folder, click Add (). See Also: Creating an Integrated Search Folder Structure
Viewing an Integrated Search Folder
This screen displays all information about one Integrated Search folder. See Also: Using the Integrated Search
To see documentation for any field on the screen, go to Complete the fields as described in the table below..
To edit information assigned to this Integrated Search folder, click Edit ( ).
).
To delete this Integrated Search, click Delete ( ).
).
Editing an Integrated Search Folder
To edit an integrated search folder, select if from the View Integrated Search Folders screen. Then, click Edit ().
Edit the fields as needed. To see documentation for any field, go to Complete the fields as described in the table below..
Searching for non-Ektron CMS400.NET Content
You can search for all non-Ektron CMS400.NET content by file title. For example, you can find the file Ektron.gif by inserting Ektron into the search field.
You can search text files (.doc, .pdf, .txt, etc.) by either file name or text within them.
Finally, you can use the following syntax to find files by extension: #filename *.extension. For example, to find all .gif files, use #filename *.gif. Be sure to click the Images button.
Note: Because Ektron CMS400.NET stores all content in .txt files, you cannot use this syntax to find files with a .txt extension.
Integrated Search Content in Search Results
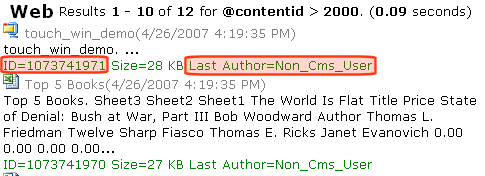
To distinguish Integrated Search content from regular content, the ID number of IS content begins with 1,000,000,000. Also, the last author name is Non_Cms_User. See illustration below.


![]()